
Nearly everyone at work uses GitHub so I shared some neat GitHub features I had recently come across. This post is a edited version of that post.
Note that many of these features interlink with each other so if you are going to use any of these features do think carefully which order you do things otherwise you will be going back on yourself to update links etc.
If you have any questions feel free to ask questions here or on Twitter.
P.S.
I just finished writing this and realise it’s rather long. Sorry!
I hope it’s useful to you. 🙏
Issue and PR Templates
Issue templates are predefined files that you can add to your project to help people who are submitting issues. It acts like a helpful reminder to the issue writer to structure their issues in a particular way which helps people on the project with handy information.
You can treat the templates as a strict form that needs to be filled in, guidelines to remind people what to fill, or a checklist of things that should be included in any issue.
Whats great about them is that you can create different issue templates for different things. Common things include:
- Bug reporting
- Enhancement request
- New feature request
- Maintenance todos
- Documentation
- Support
At work, a lot of our client repos already make use of issue templates and I think that it is one place where issue template’s as a feature shine. I would also say any open source projects can use issue templates to guide more informative issues from contributors.
I can see PR templates being useful for projects which have multiple agencies or multiple groups of developers working together. It can be a neat way to remind everyone to follow an agreed project workflow by having a checklist built into the PR template.
You can see this in action when you want to create a new issue in the Atom repo.
Notes:
- You can make granular Issue and PR templates in Github by having multitple files in a folder called .github/ISSUE_TEMPLATE or PULL_REQUEST_TEMPLATE
- Template filenames for both issues and PRs and are not case sensitive, and can have an extension such as .md or .txt, or no file extension.
- The ISSUE_TEMPLATE folder must live under a .github subdirectory that is directly in the root of the repo.
- the PULL_REQUEST_TEMPLATE folder can live in
- the root of the repo,
- the .github sub directory of the root repo
- the docs sub directory of the root repo.
- ISSUE_TEMPLATE and PULL_REQUEST_TEMPLATE must be in the default branch ( usually master ) for any of it to take effect in Github.
- Github has made it easier than ever to make Issue Templates by having a GUI on their site. Full info: https://help.github.com/articles/creating-issue-templates-for-your-repository/
- You can set query parameters to auto add issues to projects and labels using query parameters! More info: https://help.github.com/articles/about-automation-for-issues-and-pull-requests-with-query-parameters/
- If you want to have information in the template but not show when it is submitted wrap your text like this:
<!-- text you want --> - I’ve been asking in the work slack channel if anyone had any templates they felt were used well. It depends a lot on the client relationship and project, but here are some links to some repos that have example issue and PR templates you can get inspired by:
- Stevemao’s collection of GitHub issue and pull request templates : https://github.com/stevemao/github-issue-templates
- Devspace’s collection of awesome issues and PR templates in the wild: https://github.com/devspace/awesome-github-templates
- Atom’s new issue picker : https://github.com/atom/atom/issues/new/choose
- Ignacio from work shared this snippet from one of our client’s repo:
{{Description of feature/bugfix here}}

[ABC-XXX](https://client.jira.com/browse/ABC-XXX)

*I have:*
 - [ ] Ensure that all code conforms to our coding standards (Run `yarn-lint` to check JS. Run `yarn-lint-php` to check PHP)
 - [ ] Written new unit tests (or updated existing ones) for changes if necessary
 - [ ] Verified that all unit tests are passing
 - [ ] Written doc blocks and inline documentation on all new changes
 - [ ] Added the Jira card reference as a prefix to the title of the PR
Useful links to more reading:
- GitHub: About issue and pull request templates
- GitHub: Creating a pull request template for your repository
Issue Quick Links with auto labelling
One of the issues with GitHub issue templates is that you cannot pre-define labels or projects. You rely on the reporter to label the issue.
Funny thing is that GitHub does have a way to create links using query parameters to auto add a variety of things including labels and projects. You can read more about it on GitHub’s page: About automation for issues and pull requests with query parameters.
Unfortunily, if an issue reporter clicks on the green new issue button, you cannot change the address links of the buttons to add the query parameters.
The query links are rather handy in places like read mes, contributing snd supporting documentation where you may have a list of new issue reporting quick links.
Notes
- If you want to daisy chain labels, use the
,in between labels. - Any spaces should be replaced with a
+. - If you change the label name at any point, all auto-labelling will break. What this means is that if you are going to organise your labels, do that before you start adding smart, auto labelling links all over your documentation!
- There is also other stuff you can do with query parameters including title suggestions, adding bodies of text and assigning people automatically. The GitHub page has a great list of what you can add.
Organising Labels
This is something i saw in one of the company repos and was instantly 😍 in love with it!
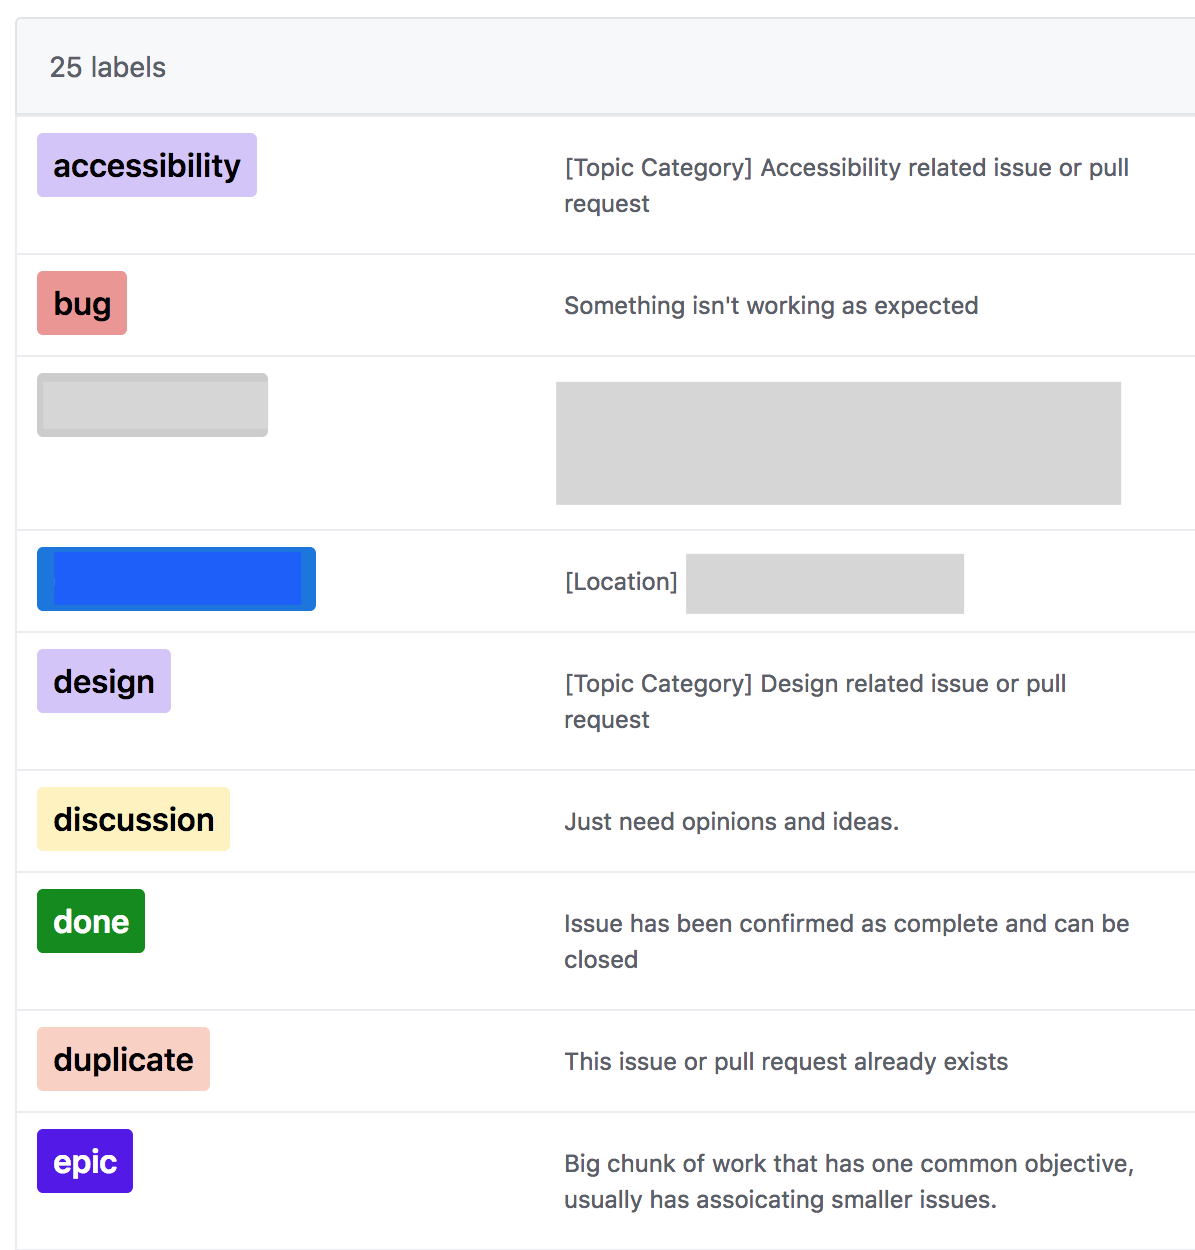
When ever you go on a list of labels page for any GitHub repo, they are automatically organised alphabethically. This is all good and dandy but I’ve always wished we could group them. What the operations team have done is used the emoji syntax to prefix every label in their list. This organises all the labels into groups which makes it easier to see what labels are for what.
Emoji organising
Emojis are not for everyone as it creates another language. I recommend using them, not to remove text, but to enhance text and treating them as pretty bullet list imagery.
Notes
- You cannot just add the emoji directly into the label. The site functionality does not pick up the emoji character so it does not reorganise the labels based on the emoji. Instead you need to use the
:emoji-name-text: - Use the GitHub Emoji Cheatsheet https://www.webfx.com/tools/emoji-cheat-sheet/ to find out what emojis you can use.
- Remember that the naming you use for each emoji will determine the order they show up on the labels. Picking an emoji starting with
:arrow-right:is going to rank higher than:wave: - Want to use emojis but don’t want to convey a subject? Use something like the colour books emoji depending on the amount of groups you need.
- Some emojis have the multiple different names.
:memo:and:pencil:get the same emoji but:memo:will be ranked higher in the labelling a-z. - Emojis don’t render in zenhub views. It means that labels are left looking like
:wave: label name - If you have any links with the label in it, as mentioned in the previous section, you will need to change the links.
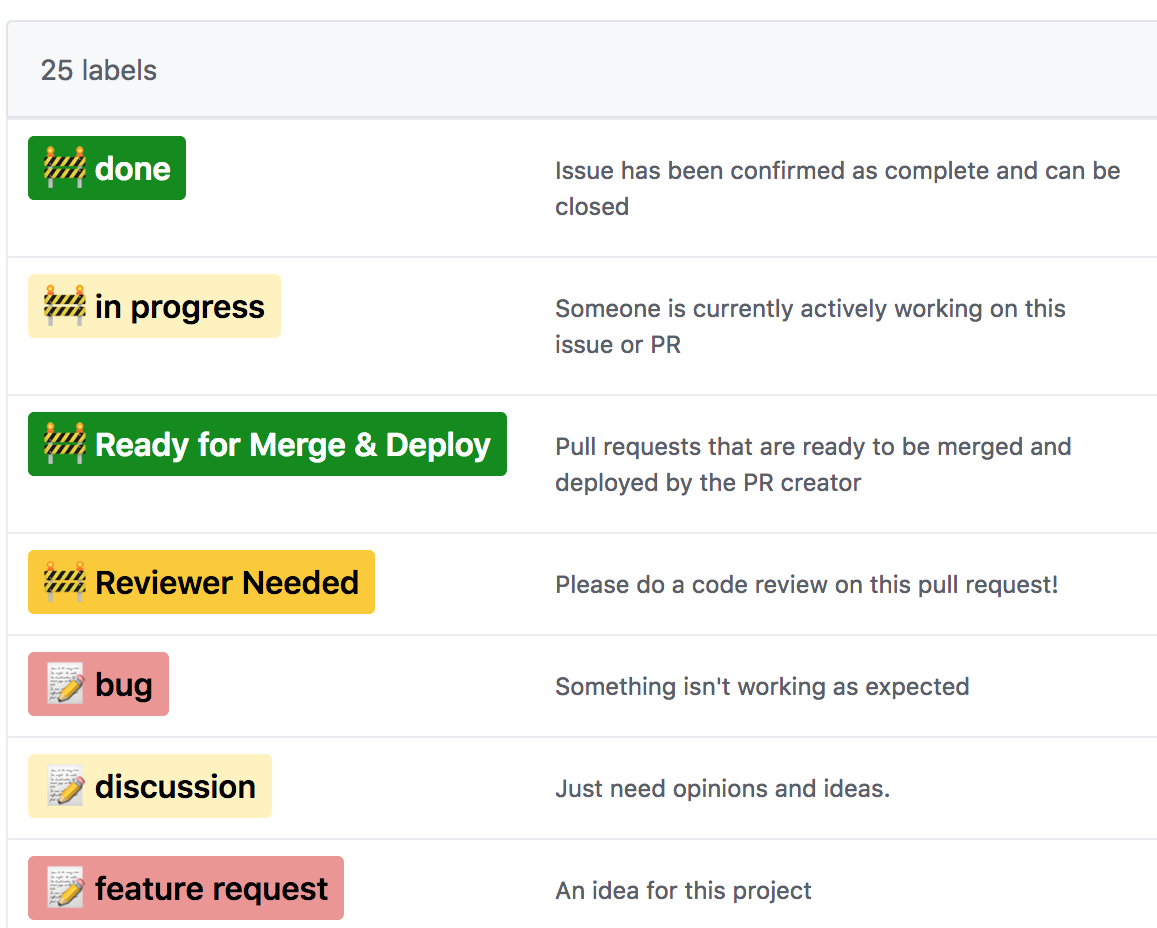
Prefix text organising
Thorsten mentioned he prefixes levels with a label.
Eg Topic: design.
This is a real neat idea as it is clean and clear. It omits the need to learn a new language.
It can get super verbose but when you are working with a multiple discipline team with drive-by contributors, it pays to be clear.
I recently updated three repos at work to use prefix labelling.

There are a few ways to prefix text to a label. I have tried a number of ways and ended up settling with using square brackets to brace the prefix and decided to lower case the whole label.
I also went with using the same colour on labels with the same prefix. This is an enhancement for people who are not colour blind.
EG. [action] in process
Notes
- Too many prefixes can lead to more confusion.
- The square brackets are ignored during the a-z ordering.
- You will want to carefully consider what prefixes you use.
- I settled with the following:
- [action] The issue/pr need or status.
- [priority] Importance level of the issue or pr.
- [topic] The subject of the issue/pr
- [type] The issue or pr type.
- [url] The domain which the issue is related to
- [ x ] All the labels that are to do with final decisions.
Label Descriptions
Labels for a long time have had a section for a description which is handy because you can define what a label is for. For a long time they have been pretty useless as you didn’t see them anywhere except when you looked at the repo’s label list.
GitHub has done a tiny but very useful feature which means writing descriptions is actually worth doing. Hover/ focus on any label in GitHub and the description will show up!
- I settled with the following:
![]()
This might seem like an pointless feature in GitHub, but this feature allows people who are new or are drive-by contributors to understand your labelling system a lot quicker.
Notes
- You can define what done means in a project.
- There is a limit number of characters available in the space. Not totally sure what it is but it does have a warning when you go over or near it.
- It accepts emojis.
Mass Actions
Thrown a lot of issues up or triaging issues?
You can perform mass actions on issues by clicking on the checkbox of each issue you want to mass action and then waiting for the call to actions to change. This will give you the option to:
- Mark issues as open or closed
- Label or de-label issues
- Set or deselect milestones
- Assign or deassign issues to a particular person.

Magical!
Notes
Sometimes when you are trying to mass actions, you won’t see the call to actions change. I guess it’s a quirk in the JS.
To get around this, just select again and it usually turns back up.
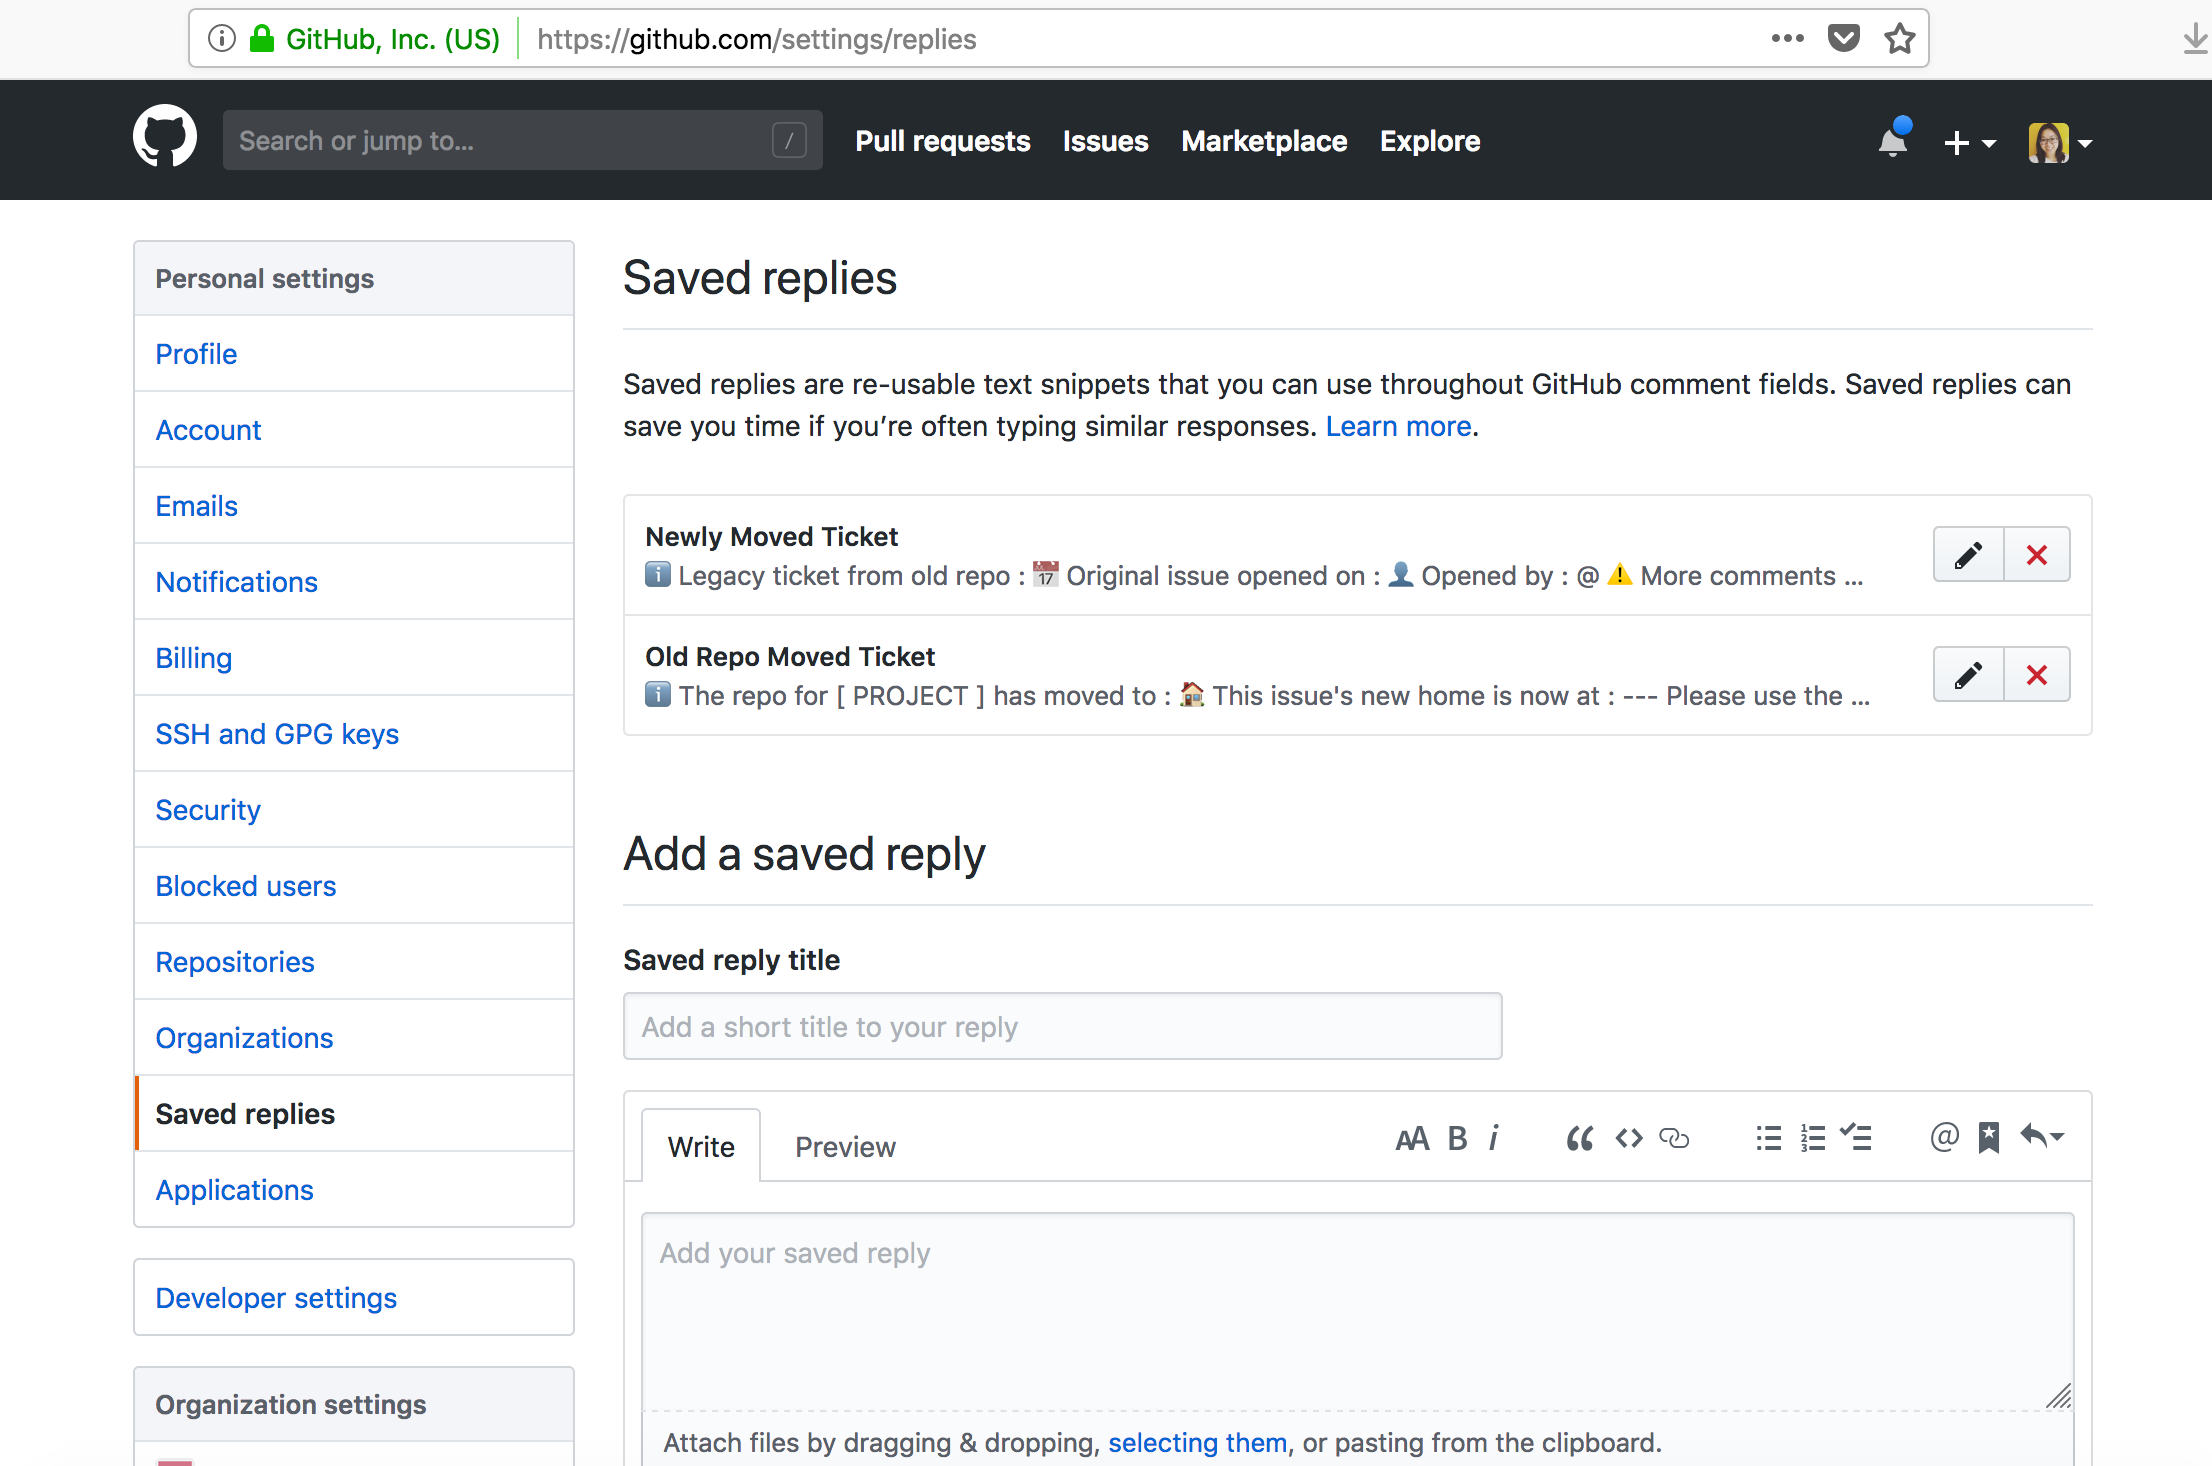
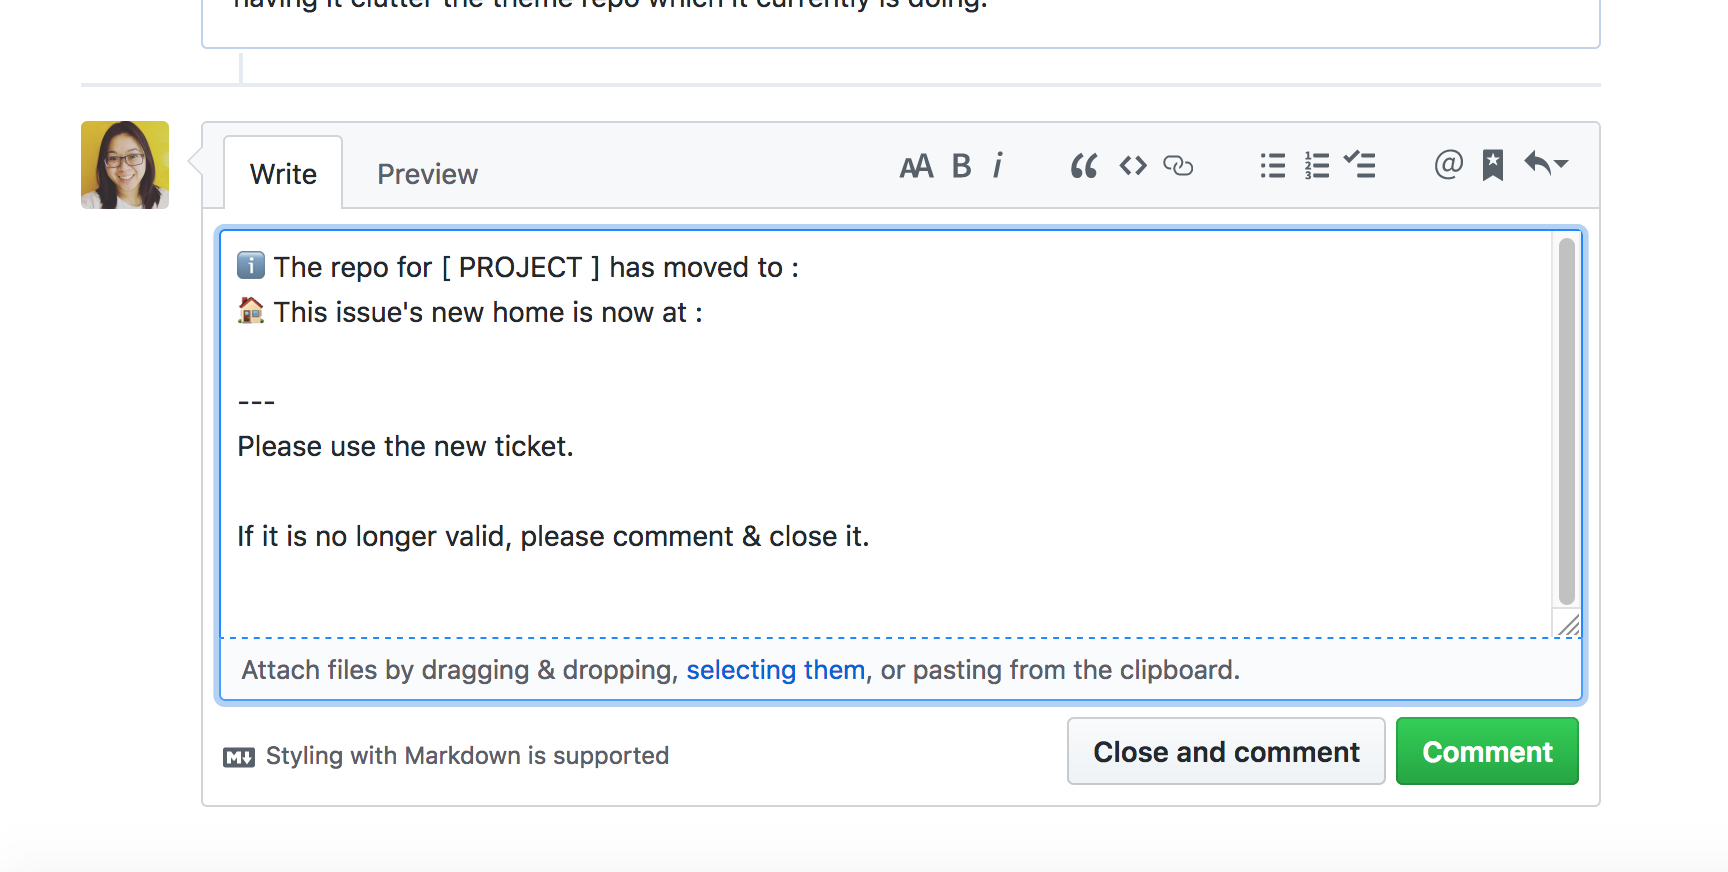
Saved Replies
Did you know you can save replies against your GitHub profile?
No? Neither did I!!! 🙈 It would have saved me so much pain when moving issues across to a different repo!
GitHub has a feature called Saved Replies. In a nutshell, it is comment templates that are saved against your GitHub profile. Go to https://github.com/settings/replies to create comment templates for yourself!
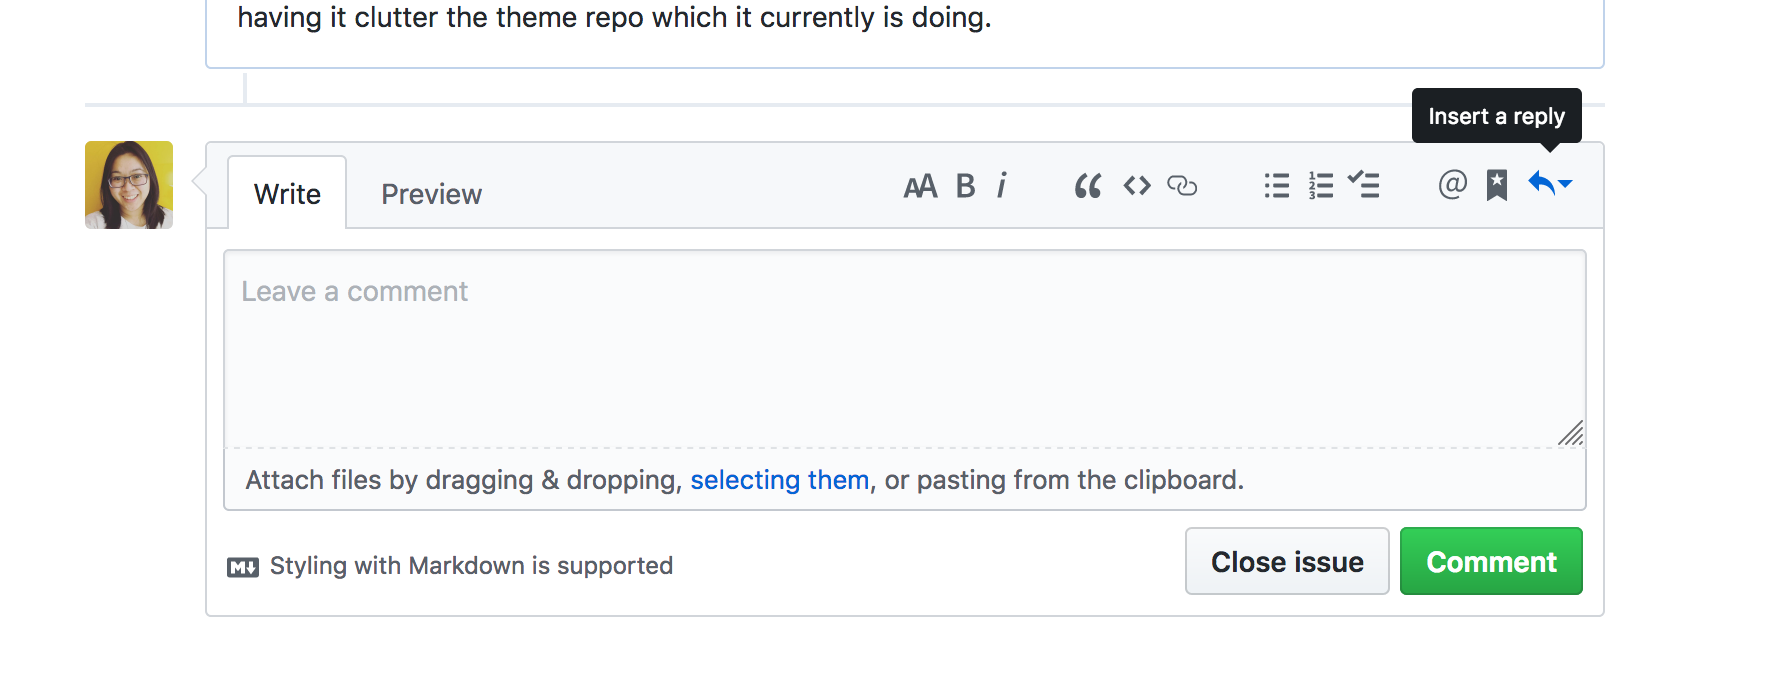
How to use a saved reply:
-

Go to any comment, click on the far right button labeled Insert a Reply -

Select the reply/template you want to use -

GitHub adds the reply to the comment.

I can see this being super useful for any clients or projects where you are reusing text again and again.
Notes
- Saved replies are per person settings not per repo. To get around this, an idea I had was to have a
/saved-replies/folder in the .github folder. You could save all the saved replies as indiviual mark down files. Remember that anyone with access to the repo will have access to those replies but it does mean that you could as a project share saved replies. - Replies stack – What i mean by this is that if you insert one saved reply, and then select another one, it does not remove the previous reply. Instead they will stack one after another in the comment. Nifty if you have multiple replies you want to include.
- The keyboard shortcuts are really slick! As they are per person, your keyboard shortcuts will be the same regardless of project.
Dot Files & Folder
On the repo I was working on, the readme file was originally at the root level on the repo. This actually meant that you could go to https://domain/readme.md and access the file.
If there was something sensitive in the read me, this would have been accessible which is not an ideal situation to find oneself in.
A common way of telling a computer that files are hidden is to put a dot before the file. Examples include .gitingore and all your hidden files on your own computers.
On the the stack I was using, the servers team have a cool rule which means that any file or folder with a dot before the name does not get served.
The same happens in Github. They look for a .github folder and will serve particular things from that file. This includes:
- Readme file
- Contributing file
- Support file
- Issue templates
- PR templates
If there are anything in a repo which should not be public accessible on the web server and it is on a stack that supports dot hidden files/ folders, consider putting it behind a dot folder.
Notes
- Accessing a file only works if you know exactly what the file name and directory path is.
- The URL of the file is case sensitive.
Project Docs, Folders & GitHub Wiki
On a repo I was working on, there were three locations for documentation
- the GitHub wiki
- .md files inside the root of the repo. E.G readme.md
- The docs folder under the root of the repo
As a developer it seems natural to put documentation in a docs folder as it means that when ever the repo is downloaded, the documentation is readily available on the local machine.
As a user, the GitHub wiki is a nice interface to read documentation from. It is especially nice when the sidebar is turned into a table of contents. The problem with the wiki is that GitHub actually has it as a separate repo.
To merge everything together, it made sense to me set up the wiki was a submodule of the master repo under the folder docs. The idea would be then all the files would live in the docs folder.
It would:
- Allow GitHub special files such as contribution, support and readme to all be in a folder that GitHub documentation states it reads from.
- Mean that GitHub special files were also accessible from the wiki as it would mean the files were in the wiki submodule.
- Mean that when you closed the repo, and did a submodule update, then you will have the all the documentation in one folder and neatly too.
This solution would have been too easy. I found a major flaw with the idea.
GitHub does not read submodules. Which means if the docs folder is a submodule, it does not acknowledge the special files in it.
I considered three different ways to handle this issue but after much trial and error, I settled.
The repo now has the wiki as a submodule of the master repo under a folder called .docs with certain special GitHub files inside of the .github folder
Notes:
docsis the more intuitive name for the folder but it means that the whole folder is visible on the server stack.- The wiki repo could have been a subfolder of docs so something like
docs/.wiki.- This would have meant that any files in
docs, such as readme.md, could have been in the docs folder and all the documentation would have been in the same place. The public visibility of the the files non dot files would have meant that the readme file was still accessible via a direct URL.- Yes I realise at a server level you can deny certain file names and other docs but I wanted to work with the constrains I found myself in and be self sufficient.
- This would have meant that any files in
- The only dot folder that the readme can live in and that GitHub can see (show up pretty at the bottom of a repo home page) is
.github - Any “special” GitHub files such a readme, contributing and support all don’t work when they are in the wiki repo, even though they are technically in the right folder eg
docs. - Wiki repo allows the use the sub folders to organise files, but when it comes to their URL, it ignores the folder structure and read the files as if they are all in the same folder.
- Wiki file names come up as the document title so capitalise as you would want it in a title.
- There is no nice automatic Tables of Contents for GitHub Wiki built in.
- There are npm installs that will build one for you.
- There are nice browser extensions but not everyone has them installed.
- Usually people build them by hand and add them to a _SIDEBAR.md file.
- Any wiki subfolder which has a _SIDEBAR.md file will appear with the folder’s sidebar rather than the wiki root sidebar.
- More info on GitHub wikis: https://help.github.com/categories/wiki/
- If a repo has wiki enabled in Github then the repo docs are available locally in a wiki folder. Downside is that they are treated as a separate git repo so you do need to pull them down intentionally. More info: https://help.github.com/articles/adding-and-editing-wiki-pages-locally/
GitHub Special Files:
Above I mentioned:
Any “special” github files such a readme, contributing and support all dont work when they are in the wiki repo, even though they are technically in the right folder eg docs.
GitHub special files, as I call them, are files that GitHub does pretty things with when the service detects that the repo has the file.
Readme
People are mostly familiar with Readme files in repos. They show up at the bottom of a Repo home page and generally are like a quick guide to the repo you are looking at.
Ryan made a read me template tool https://humanmade.github.io/readme-creator. My favourite part is the pretty table it creates with the company logo in the corner 😄.
It would be super neat if GitHub supported both .docs folders and the Readme file being part of the wiki submodule. My reasoning is that readme really acts like the front page of a repo documentation. Thus I find it weird that we can’t use the same file for the wiki index page.
I know you can link out to files outside of the wiki in the wiki, and thus you could technically do this by setting up the wiki sidebar. One problem with this method is that it wouldn’t auto show when you clicked on the wiki button on GitHub. The other problem is that the readme file will not be shown in the wiki view, you would lose the sidebar table of contents.
The only dotFolder that GitHub will detect the readme file from is .github. This is problematic if you want to hide your readme file as it is not at the root level of your repo so people might not see it straight away or know where it is stashed.
To counter this, I added a readme.md file to the root which has 3 lines on it. One which tells you what the repo name is, one which tells the reader where to find the full readme file. A third thanking them. It essentially acts as a pointer to the actual readme file.
This may seem overkill, and I guess in many ways it is, but it means I can keep the readme file inside a dotFolder and hidden from the public.
What is neat is that GitHub places a readme file inside .github with higher importance than a readme file that is at the root level of the repo.
This is a neat trick you can use if you want your readme on GitHub to have particular information showing. Can’t really imagine the situation you might want to do this but there you have it.
CONTRIBUTING and SUPPORT
Other special files include CONTRIBUTING and SUPPORT. In open source projects, they are used to encourage people to find support and to share contributing guidelines of the project. Privately, they are handy to new people of a project as they can share information like workflow, project/client glossaries and project organisational information.
If you put contributing and support into a folder like /docs/ or /.github/ or the root directory of the repo, GitHub is kind enough to show pop ups telling new people and people who have not contributing to the project for a while about the contributing and support guidelines.
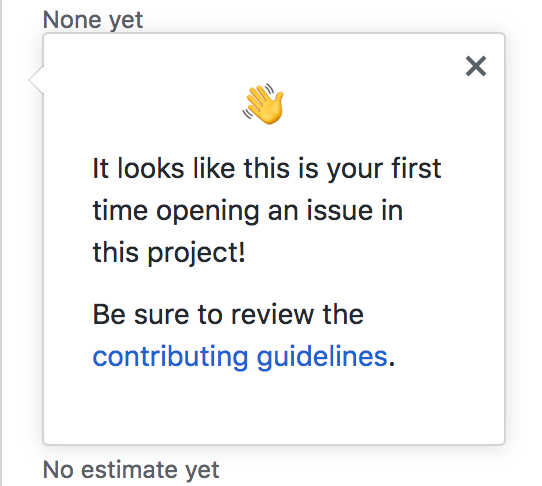
This is useful to people and a lovely feature.
My problem with this feature is similar to the Readme file. Once those files are in the wiki repo, the nice GitHub pop-up does not show anymore. This is frustrating as really those files are documentation that should live both in the wiki and in the parent repo. Ideally, documentation shouldn’t be duplicated multiple places.
In a wiki, you can link to files outside of the repo, but it means that you lose the nice sidebar/ table of contents for the documentation. The sidebar is an important way to allow people to find documentation that is useful to them.
After speaking to Kirsty about what it is like as a new contributor to a project, for a particular repo I decided to:
- Accept that contributing and support guidelines should be in the Wiki.
- The readability of reading documentation on the wiki was more important than the GitHub bubbles.
- To counter the lack of GitHub helpful bubbles, I added a line about how people should read the contributing and support guidelines into the Issue Templates. Its not as pretty but it does the job.

- Since the special files were not going to be read by GitHub regardless of what the folder was called, the wiki lives as a submodule of the parent repo in a folder
.docs. This make use of the server hidden folder magic.

End Result
The end result is:
- There is minimal duplication of documentation.
- The only duplication is from the readme file to the wiki home file.
- There are still prompts for people to read the Contributing and Support guidelines in the issue templates.
- Documentation is quickly available when working on the project locally.
- All documentation is hidden on the server.
- When on GitHub and you click on the
.docsfolder, it send you to the wiki. - Having a CONTRIBUTING file your project repository’s root, docs, or .github folder. Then, whenever someone opens a pull request or creates an issue, they will see a link to the file ➡️ https://help.github.com/articles/setting-guidelines-for-repository-contributors/. It is a good place to set project expected workflows for anyone working on the project.
- You can create a SUPPORT file to direct people to specific support resources or to let people know about ways to get help with the project. SUPPORT files can live in to a project repo’s root, docs, or .github folder. If Github see the file in any of those location, whenever someone creates an issue in the repository, they will see a link to the repo’s SUPPORT file. Read more at : https://help.github.com/articles/adding-support-resources-to-your-project/
Projects
The beginning of ZenHub for all GitHub users?
ZenHub is great – Beaumont was kind enough to give me a demo of how as a project manager, she uses ZenHub and why she loves it so much. I have to admit that I now understood it helped me understand why PMs love ZenHub a lot. The downside is that ZenHub is seat based license. If you don’t need all fo ZenHub’s fancy features, it can feel like a waste.
Projects on Github is a way to view issues and pull requests in a board view natively.
It is handy if you have multiple projects running from the same repo. You can assign tickets to a particular project board and then you will only see issues and pull requests you care about.
Projects can be set up at a repository or organisational level. If they are set up at an organisational level then issues and PRs can be pulled from multiple repos that are under the same organisation.
Another neat feature is that once a issue is assigned to the project board, GitHub has some basic automation that allows you to automate the issue moving along a kanban setup. The automation is limited, so do expect to be doing some manual drag and dropping.
It would be really neat if you could set up some automation to be based on labels. For example:
If an issue is assigned to this project,
and has a particular label,
show up in this column.
ZenHub has a really nice and direct way to create new issues. The downside is by pressing on that UI, it misses and doesn’t use the issue templates the repo might have set up.
Japh pointed out that you can create issues using the native projects view. The way you do it is by creating a note and then converting it into a issue. It has the same problem as ZenHub with the lack of ability to use the repo’s issue templates, but it is handy for quick jotting.
ProBots
Even though GitHub has some great features, the problem with many of them is the joining of features. One example is labelling and issue creation. I got introduced to ProBots which are extensions for GitHub.
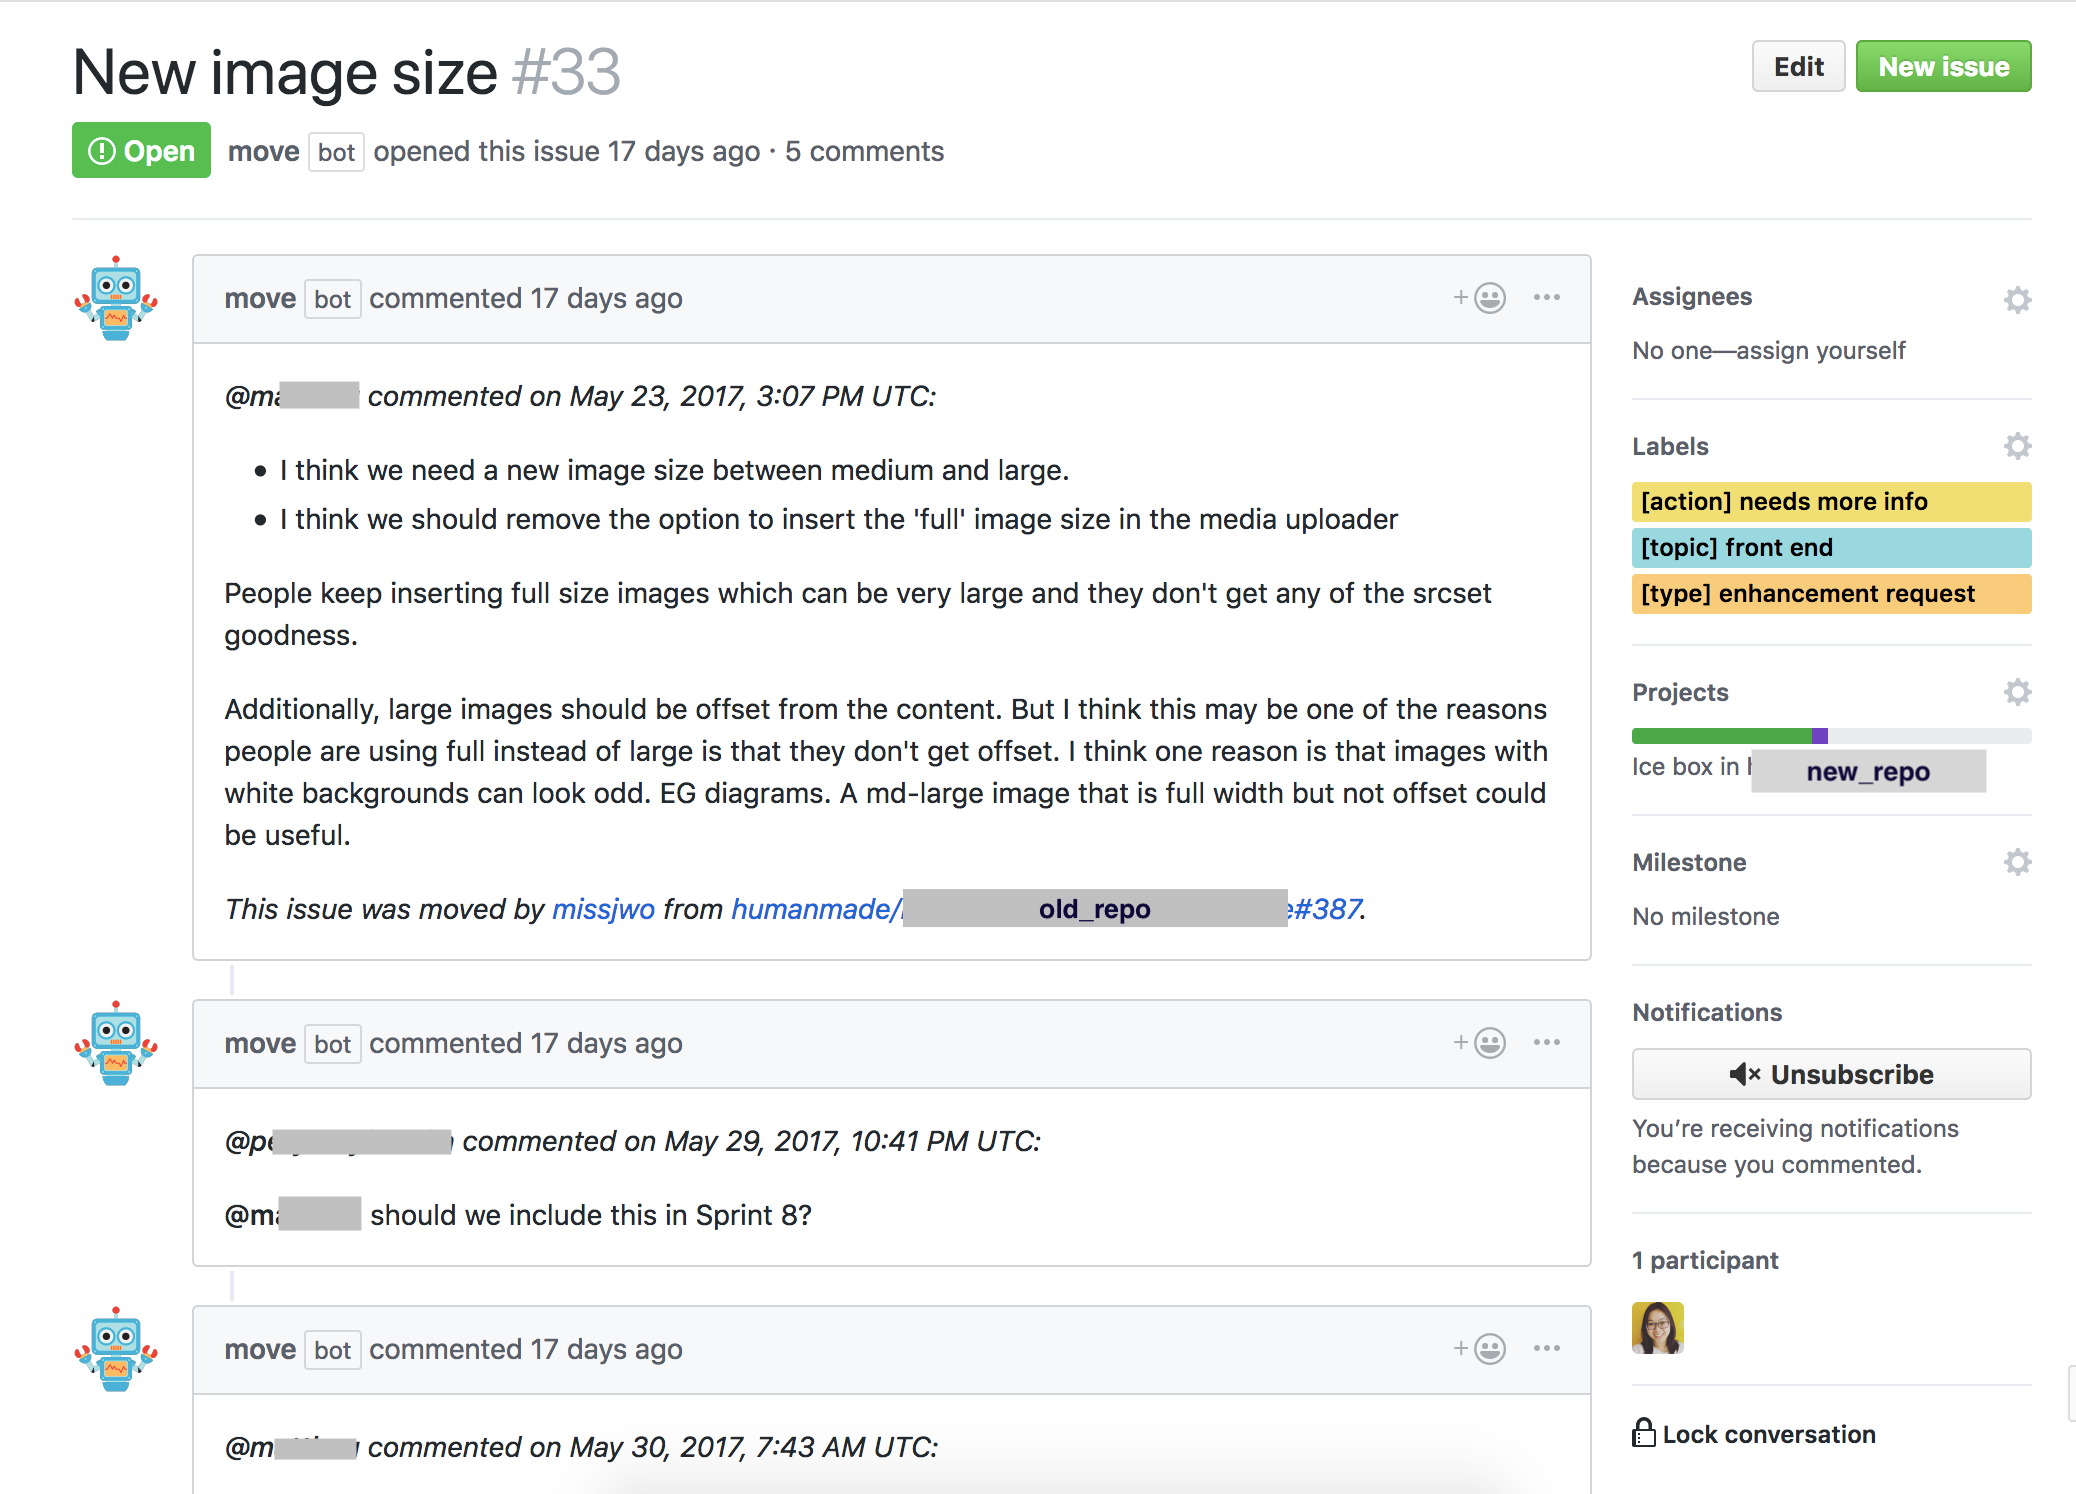
Move Bot
Move bot will take a list of comments on a issue and move them to another repository.
This is super neat as you don’t lose any context or need to go to the previous repo.
Set Up
When picking approved ProBots that are available on probot.github.io, you need to decide if you wan to install it at a repo or organisational level.
It is installed throughout the whole Human Made GitHub organisation, but to set it up, you need to have a move.yml file inside of the .github folder of the repo that you are copying from. See https://probot.github.io/apps/move/ for an example of this file.
How to use
In the issue you want to move, you write /move repo-name as a comment. You will need to replace repo-name with the name of the repository that you want to move to. If it is in a different organisation, you will need to do organisation/repo-name.

You don’t need to add anything more to the comment, but it is nice to have a explanatory of why something is being moved.
Mass moving tickets
If you are doing a mass move I recommend the following order :
- Set the Move bot settings to not auto close tickets or lock them.
- Using the multiple issue selector, label all the tickets you are going to move with
moveandrepo namelabels. It makes it clear which ones you want to move. If you do this afterwards, all the tickets are closed and it can be tricky to remember which tickets you did move. - Have the
/movecommand as it’s own comment. - Once Move bot has moved them all, use a saved reply explaining why the issue has been move and close the ticket.
The reason for 3 and 4 in that order is that:
- Move bot will not copy over any comments which only have the
/movecommand in it. - Move bot will will have done the moving before you write your explanation. If you write your explanation before the move, then the new issue will include the explanation that the ticket is being moved, which is weird to read on the new ticket – so you end up going through the new tickets and deleting the message.
Notes:
- Move bot will not move labels or assignments.
- Ideally you want something like the Issue Labeller bot to do that by handling hash tags, but it doesn’t do it at the moment. There is an issue on the bot for the feature so I recommend 👍 the feature request if you think it would be handy to you.
Other methods of moving tickets
I know there are other methods of moving tickets including ZenHub and a chrome extension that moves tickets too.
I try and stay away from ZenHub because not everyone has access to it and it’s over kill for me personally.
Japh shared a chrome extension called kamino. It doesn’t bring comments across at all, you’d need to click through to the original (now closed) issue for the discussion. It does brings across labels and things though, which Move bot doesn’t.
It also posts as the user doing the move, which means it’s not obvious that the issue was moved. Move bot solves this by posting as Move bot and then highlighting at the top of every comment the author and when the original comment was written.
Other ProBots
I haven’t experimented with all of them yet but there are some Probots that seem interesting so I’ve listed them below.
If anyone has tried out Probots and have opinions, I would love it if you shared your thoughts!
- Issue Labeller – A ProBot that scans the comment body and compares it against the labels in the repo. If there are any words in the body that are also a label then it auto labels it for you.This has the potential to be my favourite bot but it is missing a key feature for me. If you could configure the bot to find `#label` in the issue’s body and assign particular labels, it would be the golden egg. It would solve the problem I have with Issue Templates by adding `#bug`
#needtriageto the issue template so that the ProBot will find it and auto update the labels when submitted. - todo – Creates new issues from actionable comments in the code. This is handy since i write TODOs into code and sometimes forget to do them so for it to auto create a ticket for me is neat.
Other interesting ones:
- Delete Merged Branch – No more manually deleting merged branches, this lovely app does it for you. Helpful depending on project workflow.
- OOO – Set out of office responses when you are mentioned.
- WIP – Prevent merging of Pull Requests with “WIP” in the title. I like the idea, but i kind of wish it would do the same thing but only if a label was set so PR titles don’t need to be changed.
- Reminders – set reminders on Issues and Pull Requests
Git Commit Templates
If you want something similar to a PR template locally on a project, Git has commit templates!
You can tell Git to use a file as the default message so it appears in your editor when you run git commit, by setting the commit.template configuration value.
Full details: ➡️ https://git-scm.com/book/en/v2/Customizing-Git-Git-Configuration#Basic-Client-Configuration
Hi Jenny, nice article, thanks for many useful tips!
One thing I’d advise from practice is just to give up on wikis and have all in the main repo. You’re right that you’d be giving up the sidebar (and footer if that matters) but almost everything else is the same or better:
Markdown rendering is the same.
Changes to docs can undergo standard reviews via pull requests, those can be cards on the project boards, etc. This becomes a significant advantage for public repos.
Documentation is an inherent part of the project, IMO, so it doesn’t feel right to me to “hide” all the docs-related commits in a separate repo.
Single repo means that when I’m making a code change that also requires update of a documentation, it can be part of the same branch or even the same commit.
Some time ago, we decided to move all our wiki contents to the
/docsfolders and I’m personally very happy with it. If you need a nicer reading experience with navigation, search etc., just use MkDocs or similar.Thanks for letting me know its useful! I have no analytics on this site so i have no idea if people read what i wrote.
The wiki sidebar allows for the ease fo finding other pages that tiny. bit better.
Plus, you have to remember that everything i wrote wasn’t aimed fro the general public but for internal company use, so the advice comes from the way we work internally too. Having everything in /docs/ folder which is pubically accessible is why its all now in a /.docs/ folder.
We use submodules at work so when you pull down the project that the post was written about, you auto get the wiki submodule anyway.
I agree with this sentiment but it was a case of balancing findability, readability and useability not just from a developer point of view but from a multi-disapline and skillset point of view. The whole company, which includes non developers use GitHub so it has to work for all.
Not all multi-disapline people are going to have a local copy of the project on their computers, and balancing it for them as much as the developers is important.
Understood, non-developers might be a challenge, it’s hard for me to estimate how different they feel about editing a wiki vs. clicking the “edit” button on a Markdown file in the repo.
Overall, GitHub is really sweet, isn’t it? Especially since Projects are there, we don’t need much else for project management.